 The iPhone 6S failed to book after pressing the power button, why this happened? We replaced the iPhone battery before, and then the iPhone 6S won't turn on anymore, so we suspect it's caused by hardware problem, we are going to fix it by repairing iPhone PCB board.
Use screwdriver to remove the screws next to the iPhone lightning port, put the iPhone 6S on the CPB screen separator to heat, after a while, we can open the iPhone 6S smoothly. Remove the iPhone display assembly, disconnect the iPhone battery, and then remove the iPhone motherboard. There are many reasons can cause iPhone white Apple logo restart, according to our experience, we analysis this iPhone 6S restart problem is caused by iPhone baseband or iPhone Nand flash. We suspected that the owner of the iPhone 6S damage it when he replace the iPhone battery. Put the iPhone motherboard under the Stereo Zoom Microscope to observe, after observation, we found there are traces of breakdown under the screw hole, but it wasn't very serious. Carefully remove the screw hole, use graver tool to remove the adhesive that covered it, and then we can see the circuit wires of the iPhone motherboard. Continue to observe it under the microscope, it's found that there are disconnection phenomenon, there are 5 circuited wires are disconnected, and it's a serious break. Now we're going to fix the broken circuit wires on the screw hole. Clear up the solder pad, and then use QUICK 861DW hot air rework station to solder the jumper wire, apply some green UV oil to fix it. At last, assemble the iPhone 6S, press the iPhone power button, the Apple logo appear normally, after few seconds, the iPhone 6S entering the IOS system properly, the iPhone 6S is turned on successfully.
0 Comments
 We get an iPhone 6S with no service problem, we need to fix it. For this iPhone 6S, because it's damaged by dropping, so we decided to disassemble the iPhone to check hardware problem first.
Use screwdriver to remove the screws next the iPhone lightning port, and then put iPhone 6S on the CPB screen separator, after a while, we can open the iPhone 6S quickly. Remove the iPhone disassembly, disconnect the iPhone battery, and then remove the iPhone motherboard. Put iPhone motherboard under the Stereo Zoom Microscope to check (focus on the iPhone RF chip) After observing, the capacitance C4112_RF near RF chip was not the right place, it is on the other side. Replace the new capacitor by QUICK 861DW hot air rework station and then measure it again, now the iPhone 6S signal is normal. Install the iPhone 6S, turn it on, now the iPhone service is normal, we can use it properly. If the iPhone doesn't get any hardware damage, but it still shows no service, then perhaps it's caused by software problem, so we try to fix it by following software solutions: - Check cellular network coverage - Restart iPhone 6S - Update IOS - Restore iPhone 6S Here an iPhone X doesn't charge, we need to fix it. As we know, the iPhone charge failure is a common problem, and it could be caused by many reasons. If it's caused by software reason, then it's easier to fix it. In this page, here are some software solutions for fixing this problem.
1. Clean up the iPhone X lightning port If the iPhone lightning port is covered by some dust or sundries, then the iPhone X will charge slowly or won't charge. Use a small and soft brush or professional dustless cotton swab to clean the iPhone lightning port. 2. Check iPhone charge device As we know, there are two ways you can charge your iPhone X, one is traditional methods that with iPhone lightning cable, the other one is latest methods that with wireless charger. If neither of these methods is charged, first we need to check iPhone charge device. Check iPhone lightning cable, make sure the iPhone lightning cable without any physical damage, or try to use another iPhone lightning cable that with good quality to charge the iPhone X. Check iPhone wireless charger, make sure the iPhone wireless charger working condition is good, or try to use another wireless charger to charge the iPhone X. 3. Calibrate the iPhone X battery Calibrating the battery helps optimize the battery system and improve the iPhone's battery life. In order to calibrate the iPhone X battery, first let the battery run out completely, turn it back on and then let it turn off on its own, charge the iPhone until 100%, after the battery is fully charged, please reboot the iPhone X. 4. Force restart iPhone X Sometimes, your iPhone X may just be stuck on a black screen, and even if you try to recharge it, you won't be able to display the charging instructions because the system has crashed and caused the device to be unresponsive. We try to fix it by force restarting. In order to force restart iPhone X, please press and quickly release the Volume Up button, then press and quickly release the Volume Down button, finally, press and hold the Side button (Power button) until you see the Apple logo appears on iPhone display screen. 5. Restore iPhone X Restore iPhone X is last step you can do in the software aspect, it can erase all settings and data on the iPhone X, so you need to back up the iPhone X before restore it. Connect iPhone to the computer, first use iTunes to back up iPhone X, and then use iTunes to restore iPhone X. If the iPhone X still won't charge well, then we need to check hardware reasons. For the iPhone hardware damaged, it's complicated for fixing. If you are not the professional iPhone repair man, then you'd better send it to Apple care or iPhone repair shop.  We got an iPhone 6 Plus need to be repaired, the problem is that this iPhone 6 Plus always reboot automatically, we try to fix it by software solutions, but it reports unknown error 9. And then we realized that it's the hardware problem, so we disassemble the iPhone 6 Plus, and repair the iPhone motherboard. The troubleshooting tips are as follows.
Tips 1: Force restart In order to force restart iPhone 6 Plus, please press the iPhone home button and the iPhone power button at the same time, after about 10 seconds, the Apple logo will appears on the iPhone display screen, and then you can release both button. Tips 2: Update IOS In order to update IOS, please connect the iPhone 6 Plus to the computer via iPhone lightning cable, open iTunes on the computer, and then use iTunes to update the IOS. Tips 3: Restore In order to restart iPhone 6 Plus, please connect the iPhone 6 Plus to the computer via iPhone lightning cable, open iTunes on the computer, make sure the iTunes is latest version, and then use iTunes to restore iPhone. However, it failed to restore and the iTunes reports unknown error 9. According to our experience, the iPhone restarts automatically when white Apple logo appears, and there is a iTunes error 9, these problems are related with iPhone CPU, iPhone EEPROM IC and iPhone Nand flash. Tips 4: Disassemble the iPhone 6 Plus Use phone opening tools to disassemble the iPhone 6 Plus, remove the iPhone motherboard, there is no obvious faulty point. Remove the iPhone CPU cover shield, apply some heat-resistance tape to the components next to the iPhone CPU, and then use QUICK 861DW hot air rework station and tweezers to check remove the iPhone CPU. Tips 5: Repair iPhone motherboard After removing the iPhone CPU, it's found that there is a circuit leading to the eeprom was disconnected, and the solder pad of the another circuit also is unstable, so we are going to solder a jumper wire to the corresponding pins of the eeprom IC. Pic 2 Attach the iPhone motherboard to the PCB holder fixture, and then put it under the microscope. Use hot air gun to solder the jumper wire on the iPhone CPU solder pad. When it's done, soldering this jumper wire to the pins of the eeprom. Pic 3 Tips 6: Assemble/Test the iPhone 6 Plus Now we need to weld the iPhone CPU back the motherboard, and then assemble the iPhone 6 Plus. Finally, we need to test the iPhone 6 Plus. Use iTunes to restore the iPhone 6 Plus, no iTunes error code was reported. Powering the iPhone, the iPhone 6 Plus enters IOS properly, the trouble was gone. 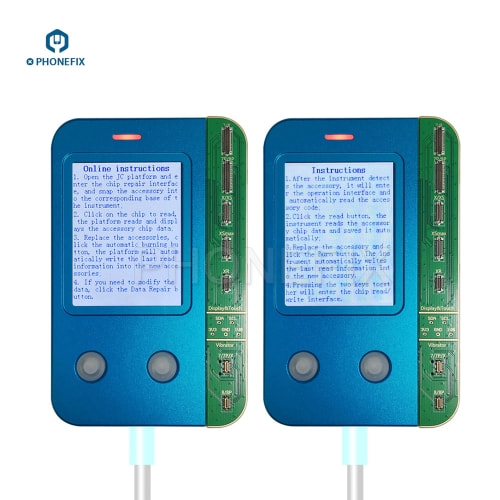 In order to repair iPhone 8/8P/X/XS/XS Mac screen light sensor problem, we need to use a programmer to read the original screen data, and the write it to the new screen, JC V1 programmer can do this. How to use JC V1 programmer? Get user manual here!
JC V1 Programmer Specific function - Repair iPhone Light sensor/ true tone function (iPhone 7- iPhone Xs Max) - Repair iPhone touch vibrator function (iPhone 7- iPhone Xs Max) - Read/Write iPhone logic/baseband EEPROM IC (iPhone 6- iPhone Xs Max) JC V1 Programmer Usage Method For the JC V1 programmer, it not only supports offline operation, but also online operation. Offline 0peration 1. For the screen light sensor operation - Connect the original iPhone screen to the corresponding seat of the JV V1 programmer - Click left button of the JC V1 programmer to read the data (the data will be saved automatically) - Connect the new iPhone screen to the corresponding seat of the JV V1 programmer - Click right button of the JC V1 programmer to write the data, so it can save the original data to the new iPhone screen) 2. For the vibrator operation - Connect the original iPhone vibrator to the corresponding seat of the JV V1 programmer - Click left button of the JC V1 programmer to read the data (the data will be saved automatically) - Connect the new iPhone vibrator to the corresponding seat of the JV V1 programmer - Click right button of the JC V1 programmer to write the data, so it can save the original data to the new iPhone vibrator) 3. For the logic/baseband EEPROM IC operation For the iPhone 6 to iPhone Xs Max logic/baseband eeprom IC, they all use 1.8V power supply,IIC communication - Click two buttons simultaneously (left and right), the JC V1 programmer will automatically enter the EEPROM IC Operation interface - Connect the iPhone logic/baseband eeprom IC to the corresponding seat of the JV V1 programmer, and then you can program the IC (read/ write) Online Operation - Connect JC V1 programmer to the computer via data cable - Connect the original accessories to the corresponding seat of the JV V1 programmer - Enter the JC assistant platform and click the EEPROM IC repairing- EEPROM IC detection-- Read EEPROM IC - Connect the new accessories to the corresponding seat of the JV V1 programmer - Click "Auto-Burn" on the platform, then it can be finished automatically - If you need to modify the data, then please click the "data repair" button  Recently, ZXWTEAM released new ZXW online account to replace the ZXW Dongle. This ZXW online account must be used on the ZXWTEAM ZXWSOFT V3.0 software, with this ZXW online account, you can view iPhone/iPad/other cell phone schematic diagram without using USB Dongle. It's a good news for most of the users, especially for the professional phone repair man; because the ZXW online account is easy to use, and it can't save the shipping cost and time.
The latest ZXW online account has 3 validity periods to choose (30 Day, 90 Day, 1 Year), it's good for the user, too. Where to download the ZXWTEAM ZXWSOFT V3.0 software? Get download link here: ZXWTEAM software download link: https://drive.google.com/file/d/15UiLdQohDhF-dgAuzUrCTWsCxUkwRZN-/view?usp=sharing How to use it ZXW online account? 1. Quickly sign up for an account on ZXWTEA. Here to get sign up link : https://t.zxwsoft.com/user/FastReg.aspx 2. Follow the the following steps to complete the authorization. In this step, you need Query code, ZXW SN and password. - Login account - After logging in, please click "Authorization Code Query" to authorize - After authorization, please click "Authorization Code" to register ZXW Serial Number (SN), in this step, you need to enter ZXW SN and password. 3. Run the ZXWTEAM ZXWSoft V3.0 software, and then login the account to use it. When using the ZXW online account, you can change the language, but please don't change the server by yourself.  We try to connect iPhone 7 to a WIFI network, but it doesn't work, the iPhone 7 WIFI function is unavailable, because the iPhone 7 failed to connect to WIFI. This iPhone has been dropped before, so we suspected the iPhone is damaged by dropping, in resulting the iPhone WIFI function doesn't work. Here is a troubleshoot method.
Disassemble the iPhone 7, take out the iPhone motherboard, we can see that the iPhone motherboard is a bit deformed, the iPhone motherboard is curved, especially the location of the iPhone WIFI. Is it the iPhone WIFI IC problem? Remove the WIFI IC first. In order to remove the iPhone WIFI IC, first we need to remove the black glue around the iPhone WIFI module IC. Use QUICK 861DW hot air rework station to heat black glue, and then carefully use tweezers to remove the black glue. Now, remove the iPhone CPU cover shield, you can use apply some high temperature resistance tape to protect the iPhone CPU. Use QUICK 861DW hot air rework station to heat the iPhone WIFI IC, and insert the graver blade to pry the iPhone WIFI IC gradually to remove the iPhone WIFI IC. Now we can see that some pins are missing on the solder pad, so the iPhone WIFI function won't working properly. Observing the iPhone motherboard under the microscope, we can clearly see that iPhone WIFI part of the pressure is severe, there are a lot of pins have dropped off. And there are 4 pins on WIFI are dropped off. We are going to replace it with the new iPhone WIFI IC. As we know, for iPhone 6S and later, the iPhone WIIF is bind with the iPhone Nand flash, if we want to remove the iPhone WIFI IC, we need to unbind it with the iPhone WIFI IC. Remove the iPhone Nand flash to unbind the WIFI. Take off the iPhone Nand flash, use JC P7 programmer to program the iPhone Nand flash to untie the WIFI, and then install the iPhone Nand flash back the iPhone motherboard. Now install the new iPhone WIFI IC to the iPhone motherboard, and then we can install the iPhone 7. At last, entering the IOS system to test the iPhone WIFI function, luckily, now the iPhone WIFI function is available, the iPhone 7 is back to normal work.  Here get a free link to update NAVIPLUS PRO3000S to the latest firmware version V1.1309. The NAVIPLUS PRO3000S is the professional phone fix tools, this professional iPhone chip programmer is used for iPhone 5 to iPhone 6 Plus.
NAVIPLUS PRO3000S V1.1309 software: https://drive.google.com/file/d/1qTJ7ui_7fcR88ZHfxkB7wOqeAaxrXWin/view?usp=sharing The operation is very easy, don't need connect with pc, with 4.3-inch LCD display and touch screen operation, it is designed to recovery and back-up the data file on NAND memory storage of iphone / ipad, support: reading, writing, testing, erasing ( make the empty HDD).  Here is an iPhone 7 doesn't boot, after checking, it's found that the iPhone CPU problem, the iPhone CPU is shorted, resulting the iPhone 7 doesn't boot anymore. Now we need to fix it step-by-step.
Step 1 Use screwdrivers to remove the tweezers next to the iPhone lightning cable, and then heat the iPhone 7 via CPB screen separator. After a while, disassemble the iPhone 7, and take out the iPhone motherboard. Step 2 Use DC power supply to measure the iPhone motherboard, the boot current is stuck on 350mA, which means the iPhone motherboard is shorted. Step 3 Use digital multimeter to measure the capacitors about the iPhone power IC, when measured the C1823, the data is 0, which means the C1823 is shorted. Open WUXINJI Dongle to check iPhone schematic diagram, we know that C1823 is the filter capacitor of PP1V8-SDRAM, and it is directly connected to CPU SDRAM. Step 4 Carefully remove the iPhone CPU shielding cover, put iPhone motherboard under the JY01 CNC Gringing machine, and then use JY01 CNC Grinding Machine to remove the CPU SDRAM. Step 5 After remove the CPU SDRAM, clean the iPhone motherboard, use BGA graver to remove the black glue, apply some solder paste to the solder pad, and then use QUICK 861DW hot air rework station to install new SDRAM to the iPhone motherboard. Step 6 Install the iPhone 7, power on iPhone, and then test it, now the iPhone 7 can be turned on smoothly.  The iPhone X rear camera is not working well, the reason is that the pins on the camera socket of the iPhone X rear camera are dropped when we disassemble the rear camera. Now, here is the solution to fix this problem to make the iPhone rear camera back to normal work.
Disassemble the iPhone X, remove the iPhone camera socket, put it under the microscope to observe, we can see that some components has been removed before it melted on the solder pad, the board is a little deformed. Firstly, we need to deal with the J3900 rear camera socket solder pad, clear it, apply some tins on the solder pad, and then use QUICK 861DW hot air rework station to solder the jumper wire. After soldered the jumper wire, wrap them up one by one, apply some green UV oil to it, and then use UV lamp light to solidify them. Now we need to solder the tin balls on the jumper wire, and then solder the socket back to it. Next we need to deal with those pins are not connected well. Apply some solder paste to those pins, and then use QUICK TS1200A soldering iron to weld it. Now, use digital multimeter to measure the camera socket, all data tested are normal. Install the iPhone X, power on iPhone X, test the iPhone X rear camera, it works properly, turn to front camera, it also works good. |
Publish
April 2019
Category |
 RSS Feed
